Internet Connections from a Sailboat – The Bullet
Background
The Bullet is one of a number of products made by the Ubiquity Company for the interconnection of computer networks. It was manufactured for use by companies providing that service and was never intended as either a consumer product or for use on a sailboat. It has never the less been adopted successfully by many in the cruising community for connection to shore based WIFI networks. It comes in several flavors:
- 2.4 GHz versions – Can be used with WIFI networks using the IEEE 802.11b, g, and n protocols.
- Bullet 2 – No longer made, but may be found in stores
- Bullet 2-HP – Lower power version - no longer manufactured, but may be found in the islands.
- Bullet M2-HP – A higher power version of the 2-HP with more internal memory.
- Bullet M2 - Titanium – A much more robust version of the bullet 2M-HP designed for harsh environments (Marine Use).
- 5 GHz versions – Used for commercial applications and of little use to cruisers as most all of the shore based WIFI Nets are in the 2.4 GHz band. It supports the IEEE 802.11a protocol.
Except for the Titanium versions all the bullets look the same on the outside (the 5 GHz are black) with a white case.
The bullet system consists of 4 separate parts. The Bullet, an antenna, a POE (power over the Internet adapter) and a Ethernet cable. The bullet uses between 12 and 24 volts DC, so some users (and vendors) have made up an adapter to connect the bullet’s Ethernet cable to a 12 volt source eliminating the need for the POE. Otherwise the POE plugs into an inverter powered 110 volt AC outlet. Because the Bullet uses the Ethernet to provide a signal rather than an external WIFI antenna, it does not suffer from a signal loss and the antenna can be mounted at any convenient location. The manufacture recommends shielded Ethernet cable, however I have used un-shielded cable for many years. The only interference I have seen is from a nearby (less than 50 meters) radar antenna.
Acquiring the Bullet.
Ubiquity does not sell to the public. Vendors can be found by looking on the Ubiquity Website – Distributors. They will usually sell to consumer and offer the cheapest prices. After-market and marine retailers now sell the bullet at prices that are about twice or more the retail price from the vendors - ask fellow cruisers. These vendors are useful as they will often stock the bullets or can get them quickly. Make sure you get the version you want. Some after-market vendors will sell the bullet with a custom operating system. While these operating systems can be easier to set up they are not as flexible and tend to be much more expensive. Beware – some vendors have been known to sell bullets that have been returned and partially set up. It is usually not their fault as the original customer may have returned it without telling them its condition.
If you are acquiring the bullet separately (i.e. not from a after-market vendor). Then you need to get an antenna, a POE, and a Ethernet cable. The antenna is usually a short (less than 1 meter) tube. It comes with a mount as the antenna is designed to be mounted and support the bullet. A 10 Db Omni-directional antenna is ideal. It can be acquired from the bullet vendor - Distributors, as well as a POE. If you choose to make your own POE consider getting a commercial POE and clipping the leads to the power supply. You can then connect these leads to 12 volts. This will power the device. Any good quality Ethernet cable will do. If you need to run the cable through bulkheads, get raw cable and end connectors.
Mounting
I have used a temporary mount connected to the flag halyard for years. it requires the Bullet be stored below when underway. More perminate mounting should consider proximity to other antennas and height. In most cases higher is better. As the bullet antennas are not usually designed for marine use, some engineering may be required. No special wire runs are required. Spray should be avoided if possible. in any case the Ethernet cable entry into the bullet should be sealed with silicon.
Set Up
The bullet may not come with any instructions unless it is from an after-market vendor. So don’t be surprised that there is nothing in the box. The user ID and Password for the operating system and the URL of the bullet are found on the end flap of the box.
Use this procedure to set up a new bullet or to reconfigure the bullet after resetting the device.
This applies to firm ware version - XM.v5.5.8. There may be minor variations to the procedure if an older or newer version of the firm ware is used. Bullet 2 and 2-HP may not use this operating system, but the setup follows the same general flow. Custom, after-market vendors will provide their own set up instruction.
Step – 1 - Getting access to the Bullet to make the necessary changes
- Set your router (or computer) to the address 192.168.1.1. The Net mask should be 255.255.255.0.
- Note - If your router is set to an address that does not include 192.168.1.20. Then plug the bullet into the Lan port on your router. The router should recognise it. It works best if the bullet and the router are on seperate domains.
- Also note - many shore side facilities use 192.168.1.1 and routers set to these domains may not play well together. I recomend setting both your router and bullet to domains some place in the middle of the available addresses.
- Plug the LAN cable from your POE to a LAN port on your router (or an Ethernet port on your computer).
- Plug the Ethernet cable from the POE to the bullet into remaining port in the POE device.
- Apply power to the POE. NOTE: if you plug the bullet into the POE with power applied you run the risk of resetting the bullet.
- Open a web browser on your computer.
- Type the address: 192.168.1.20
- You should get the bullet log in screen.
- The default User Name is UBNT, the default Password is UBNT.
- You will be asked to select a country – on older versions you could select some country other than the US and would get a higher power. This is no longer the case.
- Select – English (or what ever language is appropriate)
- Agree with terms of use
- Login
Step – 2 – Setting Up the Bullet
- You should see tabs across the top of the Bullet screen: Main, Wireless, Network, Advanced, Services, and System.
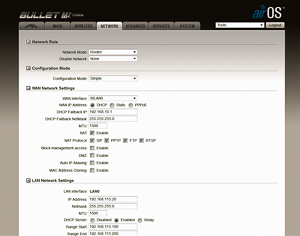
- Select the Network tab
- Under the Network mode Section:
- In the drop down box under Network Mode – select Router
- Under the WAN Network Settings Section:
- Check NAT Enable
- Check the boxes under NAT protocol: SIP, PPTP, FTP, RTSP
- Change nothing else
- Under the LAN Network Settings Section:
- Enter the LAN IP Address for the router: 192.168.221.20 or whatever address you should decide to use.
- Enter the Net mask: 255.255.255.0
- Select the radio button under DHCP Server – Enable
- Under IP Range select a range that is compatible with the IP Address above: i.e. Start 192.168.221.100 to 192.168.221.200. NOTE: here we used the range 221, but did not include the address of the Bullet itself.
- Again use the Net mask: 255.255.255.0
- Put a check in the box for DNS Proxy.
- Select the button Change in the lower right hand corner.
- Select the button Apply in the upper right hand corner.
Step – 3 – Final Configuration.
- Disconnect the power from the POE device.
- Connect the cable from the LAN connection on the POE device to the WLAN port on the router (no change necessary if using a standalone computer).
- Return the Router (or Computer) to its previous IP address.
- Reconnect the power to the POE device
- Open a web browser
- Enter the IP address of the Bullet as set above – i.e. 192.168.221.20
- Enter the default User ID – UBNT, and Password – UBNT
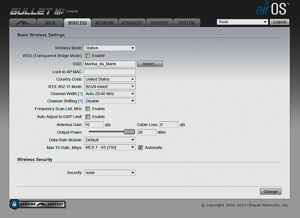
- You should see the Wireless Tab:
- Suggested Additional changes:
- Change the User ID and Password
- Backup the configuration
- Check for new software
You are ready to go.
Problems
The biggest problem is losing track of the URL the bullet is set for. If you failed to write down the URL or forgot, try the default one. If that does not work, it is necessary to reset the bullet. With power applied hold the reset button (located on the base near the Ethernet port) until the lights flash. Start at step 1 above.
Water intrusion is always an issue. Ample silicone around the place where the cable enters is a good bet.
Often the Ethernet cable will work partly out of the socket. Sometime you will get good power, but no signal. Re-seat the cable if you are not getting any stations on your setup.


Operation
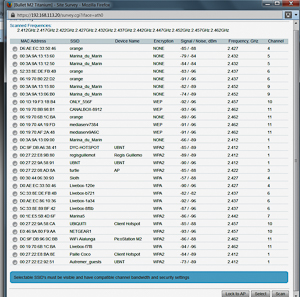
The bullet is relatively easy to operate. Power up the bullet, open a browser window, type in the URL for the bullet, log in, and go to the tab entitled – Wireless. Select the button – Select next to the SSID window. You will get a display of all the available WIFI connections available. They give the SSID name, if the connection requires a password, and the signal strength. Select the radio button next to the SSID name of the WIFI network you require. Note – many networks will show no password required, but when opening a window will require a user id and password at that time. Pay networks will also provide a page to enter you payment information. Once you have selected your network, hit select at the bottom of the screen. The screen will close and you need to hit change and then apply.
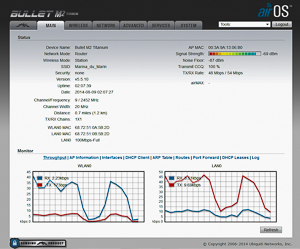
Return to the Main tab. You will see that signal strength in the upper right hand corner (if not select through put below). You will also see noise floor, transmit and receive levels and graphs at the bottom of the screen. If you see these, you are connected to the network and should open a browser window and proceed. If you do not get all of the above information displayed it likely means that the signal level is too low for the bullet to lock into the network. This can be seen by the channel/frequency window in the left column cycling from one frequency to another. With marginal signals you may see that transmit level, but no receive level. In all cases, try another station if possible.
Operational Issues -
Transmit CCQ - this is the quality of the connection. 100% indicates that every packet is only transmitted once. Lower percentages indicate some percentage of the packets have to be retransmitted. Connections below 50% are very poor.
Power Levels - on the Wireless tab, near the bottom is a power output slider. it is very tempting to push it all the way to the right (28db). Don't. Slide it to the left until you see a drop off in the CCQ. Then slide it back a tad. This level should get you the best through put and will not drown out your nieghbors.
Connection Issues - if you are connected to the shoreside WIFI, but don't seem to be getting any response. Try this. In the drop down box on the Main Page there is a trace route facility. Put in a known website (I use 208.67.222.222) and run the trace route. If it stops at the shore side provider, there is a problem with their router (it might need to be reset), but if it continues beyond the first router and hangs up or has a very big delay then there are network problems beyond the provider and there is likly nothing that can be done.
Updated - April 10, 2017

